Setting up Firebase
In order to connect to the Firebase database, we need to import the Firebase libraries into our application and provide some basic configuration. We'll use the AngularFire2 library to help us manage connecting to Firebase.
If you are using the provided server, you will follow the first set of instructions. If you are running your own server, then follow the steps the second set. Both will use the Angular environment files to provide configuration.
Connecting to the provided Firebase instance
If you are using the provided instance of Firebase, you need to know the necessary configuration to connect. The details below contain the configuration you need. Open up src/environments/environment.ts and update the const with the following.
export const environment = {
  production: false,
  config: {
    apiKey: "AIzaSyDcwSD78uqn1jIuvsCZZdmIKDLj5qvm-ZQ",
    authDomain: "oscon-2017-workshop.firebaseapp.com",
    databaseURL: "https://oscon-2017-workshop.firebaseio.com",
    projectId: "oscon-2017-workshop",
    storageBucket: "oscon-2017-workshop.appspot.com",
    messagingSenderId: "939560207287"
  }
};
These are the values Firebase needs to know in order to make a proper connection to the Firebase database.
Connecting to your own Firebase instance
If you created your own Firebase instance to use, then you'll need to lookup the configuration values in the Firebase console.
In your Firebase console, go to the Authentication link in the sidebar. At the bottom right, you'll see text that says "Need help setting up your app?", and click on the last icon with the code brackets </>.
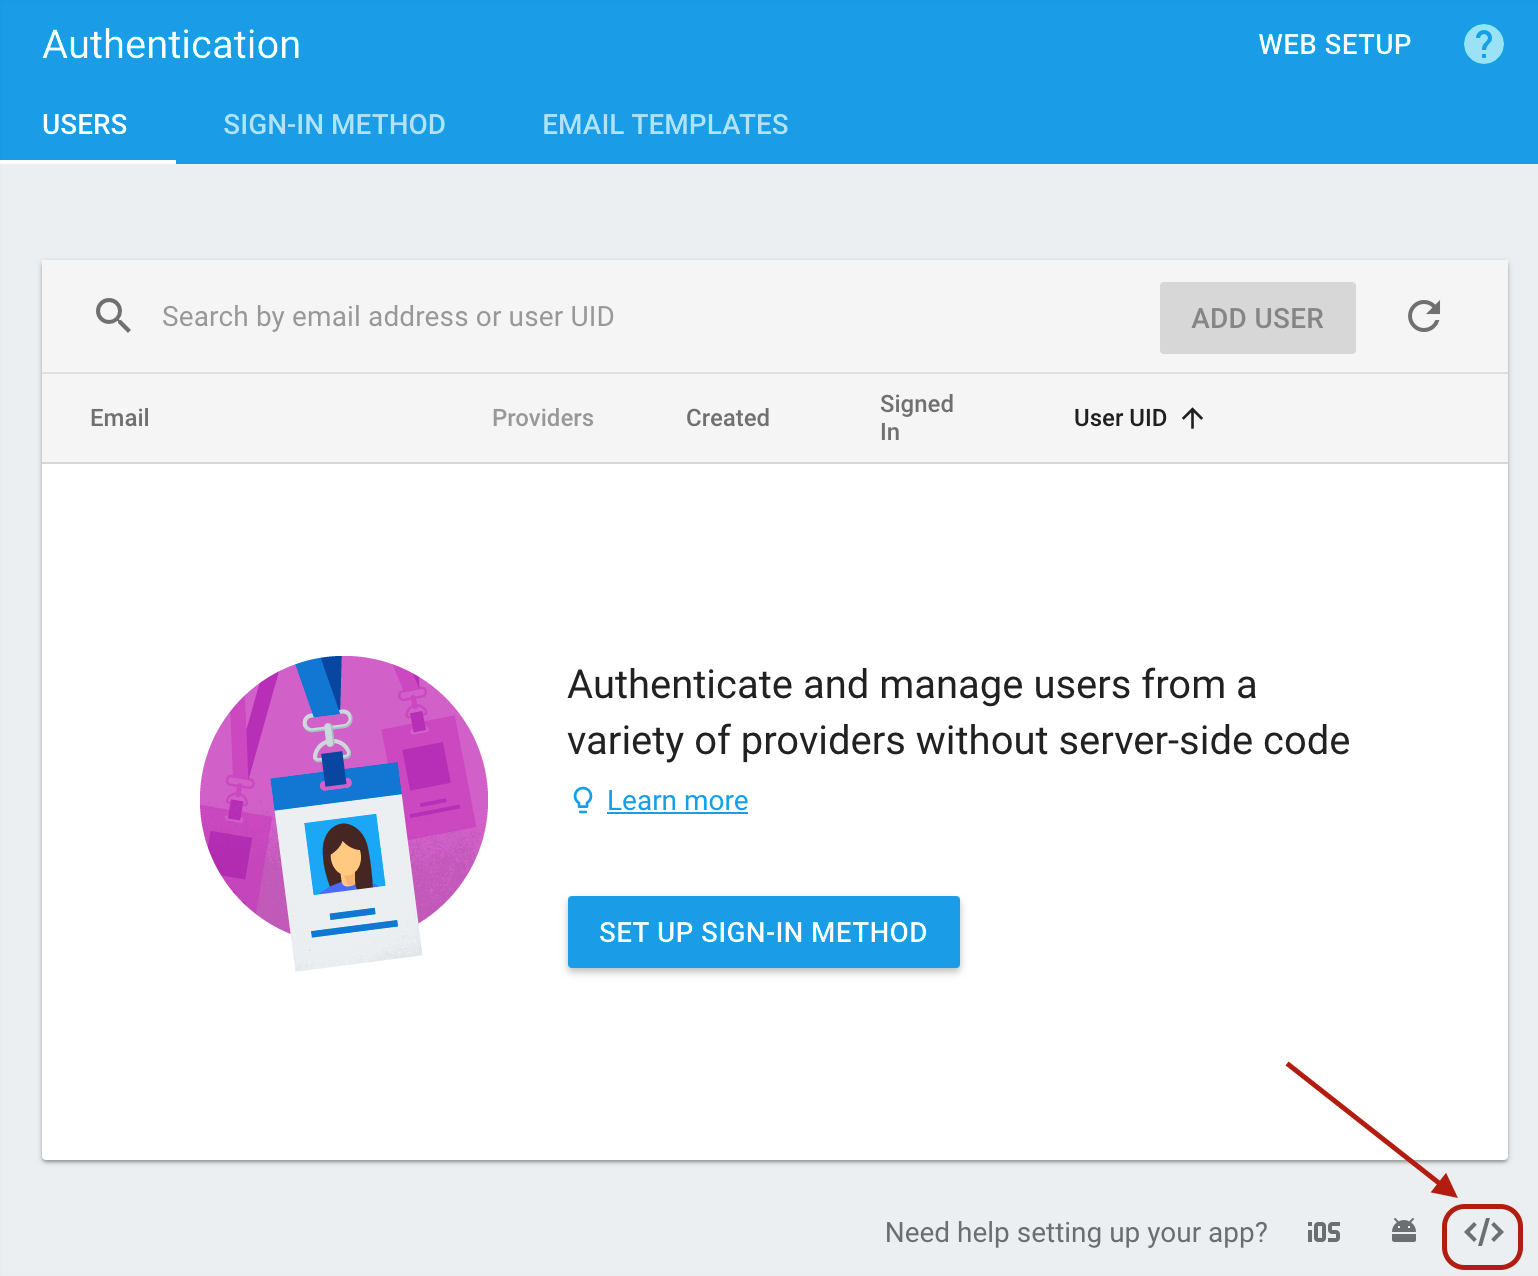
Once the modal appears, you'll see a list of the configuration values. Copy the config variable, which should appear like you see here (but with unique values for your app).
var config = {
    apiKey: "AIzaSyDcwSD78uqn1jIuvsCZZdmIKDLj5qvm-ZQ",
    authDomain: "oscon-2017-workshop.firebaseapp.com",
    databaseURL: "https://oscon-2017-workshop.firebaseio.com",
    projectId: "oscon-2017-workshop",
    storageBucket: "oscon-2017-workshop.appspot.com",
    messagingSenderId: "939560207287"
};
You'll need to copy these values into the environment configuration service. Open up src/environments/environment.ts and add a new config property and store the values inside like this.
export const environment = {
  production: false,
  config: {
    apiKey: "AIzaSyDcwSD78uqn1jIuvsCZZdmIKDLj5qvm-ZQ",
    authDomain: "oscon-2017-workshop.firebaseapp.com",
    databaseURL: "https://oscon-2017-workshop.firebaseio.com",
    projectId: "oscon-2017-workshop",
    storageBucket: "oscon-2017-workshop.appspot.com",
    messagingSenderId: "939560207287"
  }
};
These are the three values Firebase needs to know in order to make a proper connection to the Firebase database.
Importing and configuring Firebase
Now that we have the configuration values stored in our environment file, we need to actually import the AngularFire module and also the environment object which holds the configuration. In src/app/app.module.ts add the next two imports.
import { AngularFireModule } from 'angularfire2';
import { AngularFireDatabaseModule } from 'angularfire2/database';
import { environment } from '../environments/environment';
Now, add the AngularFire module and pass in the configuration.
imports: [
  BrowserModule,
  FormsModule,
  HttpModule,
  BrowserAnimationsModule,
  ClarityModule.forRoot(),
  AngularFireModule.initializeApp(environment.config),
  AngularFireDatabaseModule,
],
This makes the AngularFire library ready to use in our application, but to make sure everything is wired up correctly let's go ahead and make a connection to verify.
Open a connection to Firebase database
Let's make an initial database query to Firebase to check everything is working. Open up src/app/app.component.ts and replace it with the following.
import { Component, OnInit } from '@angular/core';
import { AngularFireDatabase } from 'angularfire2/database';

@Component({
  selector: 'app-root',
  templateUrl: './app.component.html',
  styleUrls: ['./app.component.css']
})
export class AppComponent implements OnInit {

  constructor(private db: AngularFireDatabase) {}

  ngOnInit() {
    this.db.list('data').subscribe(data => {
      console.log('data!', data);
    }, error => {
      console.error('error!', error);
    });
  }
}
When the applications loads, there should be a console log message with data! and an empty array. If not, then double check you have provided the correct configuration values. Here is a screenshot of what the console should output.
